How to Embellish a Quilt Top with Chenille By The Inch
How to Embellish a Quilt Top
with Chenille By The Inch Shapes
There are so many people affected by breast cancer, and being among the group known as survivors, I decided to design a pink ribbon quilt. I introduced Awareness Ribbons pattern in 2012 to commemorate my four-year birthday. But as I designed the quilt, I realized that there are ribbons for so many different causes. Rather than name this pattern Pink Ribbons, I decided to name it Awareness Ribbons. The ribbon color can be changed for any specific cause. I'll give you a link at the bottom of this blog that will direct you to a site that gives the ribbon color for dozens of causes.
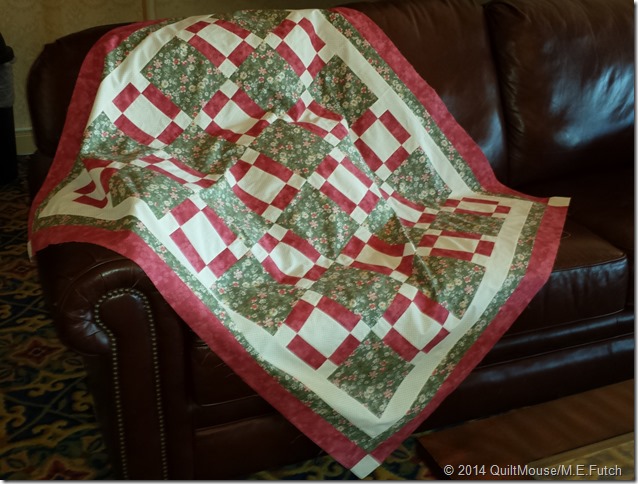
Mary Ellen Futch, my friend and quilt tester par excellence, recently remade the Awareness quilt top and wrote three blogs to show how to do several of the steps. There is a link to Mary Ellen's Blog at the end of this page. This is a continuation of those blogs. Here's the quilt top that Mary Ellen made and photographed.

How to Add Chenille By The Inch Pink Ribbons to a Quilt Top
The first step is to find the center of the block. I did that with a water-soluble pen and a ruler. Then I used a light box with the pattern taped to the center to trace the Ribbon. Tip: Go light on the marks when using a water-soluble pen. Make a dotted line rather than a heavy mark. Use ice water in a spray bottle to remove the ink.

It is easier to sew into a curve, so start sewing the chenille on the straight leg of the design. Rather than trying to cut the strip to fit, use one whole strip of Chenille By The Inch. I'll show you how to trim the excess later. Set your machine to a needle down position. I find that the automatic lock stitch on most machines is not secure enough to hold the strip when you begin to brush the chenille, therefore I make a reverse stitch or two at the beginning and end of each strip.

As you begin stitching into the curve of the ribbon, stitch slowly, taking one or two stitches and adjusting as needed to make it through the curve, Remember, needle down at all times. See how the chenille is beginning to ride up on the foot? Just lift the presser foot and...

Using a stylist, bamboo skewer or, as I often do, the tip of my seam ripper to slide the chenille strip under the foot. Continue to stitch and adjust through the curve.

When you get to the end of the ribbon design, create a little kick-up like you see on most pink ribbons. This means a pretty tight curve. But once again, take it nice and easy, stitching a stitch or two and adjusting. The tip of my seam ripper comes in handy at this point.

Once the ribbon design is complete, do a reverse stitch, and remove the quilt from the machine. You will have a long tail of chenille left over.

Trim the excess chenille strip. Save the piece you cut off and...

Start your next ribbon with it. If it looks like you will run out of this piece in the middle of the curve...

Cut enough off of the strip to end before the curve of the ribbon top begins.

Then tuck a new piece of Chenille By The Inch under the strip you are stitching, using the tip of the seam ripper to lift the previous strip. Overlap about 1/8", continue to stitch.

Here's the ribbon, stitched in place but still un-fluffed. Notice the ruffle on the curve and the overlap where we slipped the new chenille strip in place. When you fluff the chenille the ruffle and overlap will magically disappear.

Here's a photo of the quilt top with all the ribbons sewn in place. Next step, I sent it to the long-arm quilter, Sew Pieceful Quilting, with special instruction to quilt around the ribbons, not over them. The chenille will not fluff if quilted over.

Look at this beautiful quilting that David and Karen did. It is perfect!

The next step is to fluff the chenille. Watch this video clip on fluffing. Use a circular motion to brush and mist the piece with water. If you add one or two drops of fabric softener to your water, it speeds up the fluffing process.
Once the chenille dries, look how fluffy it gets.
 A special thanks to my friend Mary Ellen Futch for Blogging about this quilt in January 2014. You can read her Blog at http://mefutch.wordpress.com. A special thanks to Karen and David Denny at Sew Pieceful Quilting (903-469-3464) for always doing a magnificent job with the quilting the Fabric Café quilts.
For a list of Awareness Ribbons with their meanings go to http://en.wikipedia.org/wiki/List_of_awareness_ribbons
Fabric for this quilt is available at www.fabriccafe.com
You may also enjoy my video, Quilting the quilt with Chenille By The Inch. http://www.youtube.com/watch?v=x8Cj7RCHRic


It's good to see how to add the Chenille to a quilt top. I can't wait to see the finished quilt. The video is fun watching the sewn stitched strips turn into fluffy ribbons!
ReplyDelete